Onboard Links
This document highlights the details about generating onboarding links (Link KYC).
You can onboard your customers without any development time by simply sending them a link. These links are hosted on HyperVerge servers and can implement any workflow of your choice. The onboard links use our JavaScript SDK internally, supporting all corresponding customizations.
How to generate an Onboard Link
You can create an onboard link either from the dashboard or by using an API call.
Generating Onboard Link from the Dashboard
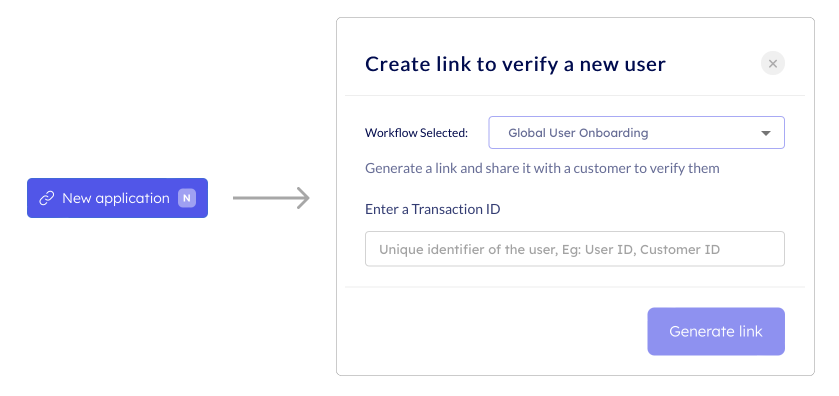
This is completely no-code as you can create a link by just clicking on a button. To create the link, follow these steps:
- Head over to Applications Tab of the dashboard
- Click on the 'New Application' button
- Select the workflow
- Enter a transaction ID for the application (Transaction ID is a unique identifier for the application)
- Generate the link and share it with the customer
Generating Onboard Link with an API call
While the dashboard method works fine for a handful of users, automating the link generation process for many users is recommended by integrating the Onboard Links API:
API Request
curl --location --request POST 'https://ind.idv.hyperverge.co/v1/link-kyc/start' \
--header 'appId: <Enter_the_HyperVerge_appID>' \
--header 'appKey: <Enter_the_HyperVerge_appKey>' \
--header 'Content-Type: application/json' \
--data '{
    "workflowId": "<Enter_the_Workflow_ID>",
    "transactionId": "<Enter_the_Transaction_ID>",
    "redirectUrl": "<Enter_the_Redirect_URL>",
    "inputs": "<Enter_required_Inputs>",
    "validateWorkflowInputs": "<Enter_yes_or_no>",
    "allowEmptyWorkflowInputs": "<Enter_yes_or_no>",
    "forceCreateLink": "<Enter_yes_or_no>",
    "forceLaunchSDK": "<Enter_yes_or_no>",
    "redirectTime": "<Enter_the_redirection_time>",
    "authenticateOnResume": "<Enter_yes_or_no>",
    "mobileNumber": "<Enter_the_mobile_number>",
    "email": "<Enter_the_email>"
}'
Note: If
authenticateOnResumeis"yes", include either"mobileNumber"or"email"field in the request body.
Input Parameters
| Parameter | Mandatory / Optional | Type | Description | Input Format | Default Value |
|---|---|---|---|---|---|
appId | Mandatory | string | You can access this from the dashboard's credentials tab | Not Applicable | Not Applicable |
appKey | Mandatory | string | You can access this from the dashboard's credentials tab | Not Applicable | Not Applicable |
workflowId | Mandatory | string | Workflow ID of the workflow of your choice from the dashboard | Not Applicable | Not Applicable |
transactionId | Mandatory | string | A unique identifier for the customer's application (e.g., userId, customerId, etc.). This key will be used by the dashboard to show the application details | Not Applicable | Not Applicable |
redirectUrl | Optional | string | After onboarding is completed, the user will be redirected to this URL. The application status would be suffixed to the URL (?status=<application-status>) | Not Applicable | Not Applicable |
inputs | Optional | object | Some workflows might need certain user details to function. These are the additional inputs for the KYC process Learn more about Input Fields | Not Applicable | Not Applicable |
languages | Optional | object | Supported languages for the KYC frontend | Not Applicable | |
defaultLanguage | Optional | string | Default language for the KYC frontend. You can select a default language for the onboarding link's user interface by providing its corresponding ISO code. If not provided, the Web SDK defaults to English | Supported ISO codes for languages | English |
expiry | Optional | integer | Integer value that specifies the expiry of the link generated. Maximum value can be 1440 (minutes). By default, the link is valid for 24 hours | 1 to 1440 (minutes) | 1440 |
linkDomain | Optional | string | The domain for the KYC link | Not Applicable | KYC_BASE_URL |
validateWorkflowInputs | Optional | string | Fetches workflow and validates fields in the inputs object | yes / no | no |
allowEmptyWorkflowInputs | Optional | string | When enabled with validateWorkflowInputs, allows empty strings to be passed as workflow inputs | yes / no | no |
forceCreateLink | Optional | string | This parameter, when enabled, re-generates the active onboarding link associated with the same transaction ID | yes / no | yes |
forceLaunchSDK | Optional | string | When the value is set as yes, link KYC would launch the SDK irrespective if the link has already reached the end state before. Instead of showing the end screen with application status, it would allow the user to continue/proceed with the journey using the same link. This parameter should be used only if you have Cross Platform Resume (CPR) enabled for your setup | yes / no | no |
redirectTime | Optional | string | Time in seconds before redirect after KYC completion | string | 5 seconds |
showGetStartedScreen | Optional | string | Whether to show the get started screen | yes / no | yes |
enableDarkMode | Optional | string | Whether to enable dark mode | yes / no | no |
setUseLocation | Optional | string | Whether to use location services | yes / no | no |
lightThemeLoaderColor | Optional | string | Loader color for light theme (hexcode value) | Hex color code | Not Applicable |
darkThemeLoaderColor | Optional | string | Loader color for dark theme (hexcode value) | Hex color code | Not Applicable |
backgroundColor | Optional | string | Configurable background color (hexcode value) | Hex color code | Not Applicable |
setUniqueId | Optional | string | Unique identifier for the session. The value passed here will be passed to SDK | Not Applicable | Not Applicable |
setCustomFontStylesheet | Optional | string | URL for a custom font stylesheet | URL string | Not Applicable |
showCustomEndScreen | Optional | string | The end screen configs have to be added to workflow when created. If set to yes and the config is present in workflow, the end screen provided in workflow will be shown to user based on status instead of default completion screen | yes / no | Not Applicable |
authenticateOnResume | Optional | string |
| yes / no | no |
mobileNumber or email | Optional | string |
| Not Applicable | Not Applicable |
Success Response
The following code snippet demonstrates a successful response from the Onboard Links API:
{
    "status": "success",
    "statusCode": 200,
    "metadata": {
        "requestId": "<Request_ID>"
    },
    "result": {
        "startKycUrl": "<url>"
    }
}
Success Response Details
The following table outlines the details of the success response from the Onboard Links API:
| Parameter | Type | Description |
|---|---|---|
| status | string | The status of the request |
| statusCode | number | The HTTP status code of the response |
| metadata | object | The metadata object containing additional response information |
| metadata.requestId | string | The unique request identifier for tracking purposes |
| result | object | The result object containing the response data |
| result.startKycUrl | string | This is the onboard link ready to be used for an end user |
Failure Response
The following code is an example of a failure response from the Onboard Links API:
{
    "status": "failure",
    "statusCode": 422,
    "metadata": {
        "requestId": "<Request_ID>"
    },
    "result": {
        "error": "\"workflowId\" is required"
    }
}
Error Responses
The following are some error responses from the Onboard Link API:
- Invalid Mobile Number/e-Mail
- Incorrect Workflow ID
{
    "status": "failure",
    "statusCode": 409,
    "metadata": {
        "requestId": "<Request_ID>"
    },
    "result": {
        "error": "This transaction is associated with a different mobile number or email"
    }
}
{
    "status": "failure",
    "statusCode": 422,
    "metadata": {
        "requestId": "<Request_ID>"
    },
    "result": {
        "error": "Workflow not found"
    }
}
Failure and Error Response Details
A failure or error response from the API contains a failure status with a relevant status code and error message.
The following table lists all error responses:
| Status Code | Error Message | Error Description | Error Resolution |
|---|---|---|---|
| 409 | This transaction is associated with a different mobile number or email | The mobileNumber or email provided in the request differs from the one originally associated with the respective transaction ID | Use the same mobile number or email that was originally associated with the transaction ID, or create a new transaction ID |
| 422 | "workflowId" is required | The required workflowId parameter is missing from the request | Include the required workflowId parameter in the request |
| 422 | Workflow not found | workflowId entered in the request body is incorrect | Verify and provide a valid workflowId from the dashboard |
| 429 | Rate limit error | The number of requests per minute has crossed the set limit for your credentials | Retry the request after some time or contact the HyperVerge team if the issue persists |
| 5xx | Server Error | Please reach out to HyperVerge for these errors | Check the request headers or contact the HyperVerge team for resolution |
Accessing the Results
After a user completes the onboarding journey through an onboard link, you can access the results through multiple methods:
Redirect URL Parameters
When the onboarding journey completes, the application status and transaction ID are automatically appended to your redirectUrl as query parameters. This allows you to update your frontend UI based on the journey outcome.
Example:
If your original redirectUrl is:
https://hypervergesamplewebsite.com
After completion, the user will be redirected to:
https://www.hypervergesamplewebsite.com/?transactionId=abcd1234&status=user_cancelled
Do not use redirect URL parameters for backend decisioning. The status and transaction ID in the redirect URL are intended for frontend UI updates only. To avoid potential security risks (such as man-in-the-middle attacks), always use backend APIs for making critical business decisions.
Dashboard
All applications automatically appear on the HyperVerge Dashboard, where you can view application details, review statuses, and manually approve or decline applications that require review.
Backend Integration
For production-ready integrations, use these backend APIs:
- Results Webhook: Receive real-time notifications when applications complete or status changes. This is the recommended method for automated decisioning workflows.
- Output API: Fetch application summaries, flags, and status information programmatically using the transaction ID.
- Logs API: Retrieve comprehensive details including outputs from all modules executed during the application journey.
Next Steps
- Integrate Results Webhook: Receive backend updates when journeys complete using the Results Webhook API.
- Use Output API: Fetch application summaries and make secure decisions using the Output API.